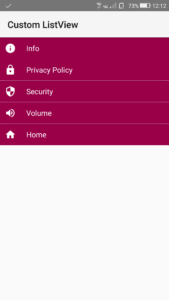
This tutorial shows how to display a Map List containing text and images in a Custom ListView.
Step 1: Create a new project with name ListViewExample and package name com.myexample.listview. Select File/New/New Project. Fill the forms and click “Finish” button.
Step 2: Open res/layout/xml (or) main.xml and add following code. Here we add a ListView mainListview1.
 <?xml version="1.0" encoding="utf-8"?>
<LinearLayout
	xmlns:android="http://schemas.android.com/apk/res/android"
	xmlns:tools="http://schemas.android.com/tools"
	xmlns:ads="http://schemas.android.com/apk/res-auto"
	tools:context=".MainActivity"
	android:layout_width="match_parent"
	android:layout_height="match_parent"
	android:orientation="vertical">

	<ListView
		android:layout_height="wrap_content"
		android:layout_width="wrap_content"
		android:id="@+id/mainListview1"/>

</LinearLayout>
Step 3: In res/drawable/ directory add images to be used in ListView. E.g. ic_info_white_24dp.png, ic_lock_white_24dp.png, ic_security_white.png, ic_volume_up_white.png, home.png.
Step 4: In res/layout/ directory add a new file list_item.xml and add following code. Here we add a TextView for displaying text and an ImageView for displaying images.
 <?xml version="1.0" encoding="utf-8"?>
<LinearLayout
	xmlns:android="http://schemas.android.com/apk/res/android"
	android:layout_width="match_parent"
	android:layout_height="wrap_content"
	android:orientation="horizontal"
	android:background="#990048">

	<ImageView
		android:layout_height="match_parent"
		android:layout_width="wrap_content"
		android:src="@drawable/ic_launcher"
		android:id="@+id/listitemImageView1"
		android:padding="10dp"
		android:scaleType="fitCenter"/>

	<TextView
		android:layout_height="wrap_content"
		android:layout_width="match_parent"
		android:text="Large Text"
		android:id="@+id/listitemTextView1"
		android:padding="12dp"
		android:textSize="16sp"
		android:textColor="#FCFCFC"/>

</LinearLayout>
Step 5: Open app/src/main/java/package and open MainActivity.java. Add following code in it. Here we create a Map list with a title and image at each position, and set an adapter to display this in ListView.
package com.myexample.listview;

import android.app.*;
import android.os.*;
import android.view.*;
import android.view.View.*;
import android.widget.*;
import java.util.*;
import android.content.*;

public class MainActivity extends Activity {

	private ListView listview1;
	// Create a new Array of type HashMap
	private ArrayList<HashMap<String, Object>> maplist = new ArrayList<>();

	@Override
	protected void onCreate(Bundle savedInstanceState) {
		super.onCreate(savedInstanceState);
		setContentView(R.layout.main);

		listview1 = (ListView) findViewById(R.id.mainListview1);

		// Toast item title when ListView item is clicked
		listview1.setOnItemClickListener(new AdapterView.OnItemClickListener(){
				@Override
				public void onItemClick(AdapterView<?> parent, View child, int pos, long _pos){
					Toast.makeText(getApplicationContext(), maplist.get(pos).get("title"), Toast.LENGTH_LONG).show();
				}
			});

		// Add items to the Map list
		{
			HashMap<String, Object> _item = new HashMap<>();
			_item.put("title", "Info");
			_item.put("icon", R.drawable.ic_info_white_24dp);
			maplist.add(_item);
		}
		{
			HashMap<String, Object> _item = new HashMap<>();
			_item.put("title", "Privacy Policy");
			_item.put("icon",  R.drawable.ic_lock_white_24dp);
			maplist.add(_item);
		}
		{
			HashMap<String, Object> _item = new HashMap<>();
			_item.put("title", "Security");
			_item.put("icon",  R.drawable.ic_security_white);
			maplist.add(_item);
		}
		{
			HashMap<String, Object> _item = new HashMap<>();
			_item.put("title", "Volume");
			_item.put("icon",  R.drawable.ic_volume_up_white);
			maplist.add(_item);
		}
		{
			HashMap<String, Object> _item = new HashMap<>();
			_item.put("title", "Home");
			_item.put("icon",  R.drawable.home);
			maplist.add(_item);
		}

		// Define Custom Adapter for the Map list and display it in ListView
		CustomListAdapter adapter = new CustomListAdapter(this, maplist);
		listview1.setAdapter(adapter);
		((BaseAdapter)listview1.getAdapter()).notifyDataSetChanged();

	}

	public class CustomListAdapter extends BaseAdapter {
		private Context context;
		ArrayList<HashMap<String, Object>> items;
		// Public constructor
		public CustomListAdapter(Context context, ArrayList<HashMap<String, Object>> items) {
			this.context = context;
			this.items = items;
		}

		@Override
		public int getCount() {
			// Return total of items in the list
			return items.size();
		}

		@Override
		public Object getItem(int position) {
			// Return list item at the specified position
			return items.get(position);
		}

		@Override
		public long getItemId(int position) {
			return position;
		}

		@Override
		public View getView(int position, View convertView, ViewGroup parent) {
			View v = convertView;
			// Inflate the layout for each list row
			LayoutInflater _inflater = (LayoutInflater)getBaseContext().getSystemService(Context.LAYOUT_INFLATER_SERVICE);
			if (v == null) {
				v = _inflater.inflate(R.layout.list_item, null);
			}
			// Set Width of ListView to MATCH_PARENT
			parent.setLayoutParams(new LinearLayout.LayoutParams(LinearLayout.LayoutParams.MATCH_PARENT, LinearLayout.LayoutParams.WRAP_CONTENT));
			// Get the TextView and ImageView from CustomView for displaying item
			TextView txtview = (TextView) v.findViewById(R.id.listitemTextView1);
            ImageView imgview = (ImageView) v.findViewById(R.id.listitemImageView1);

			// Set the text and image for current item using data from map list
            txtview.setText(maplist.get(position).get("title").toString());
            imgview.setImageResource(maplist.get(position).get("icon"));

			// Return the view for the current row
			return v;
		}
	}

}
Output:
Now run the app. The app will display a ListView with icons and text.