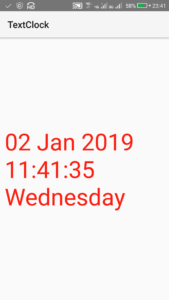
Here we will create a simple Digital Clock android app, which displays the current date, current time and day.
Step 1: Create a new project with name ‘Digital Clock’ and package name com.myexample.clock. Fill the forms and click “Finish” button.
Step 2: Open res -> layout -> xml (or) main.xml and add codes for displaying a TextClock.
<?xml version="1.0" encoding="utf-8"?>
<LinearLayout
	xmlns:android="http://schemas.android.com/apk/res/android"
	android:layout_width="match_parent"
	android:layout_height="match_parent"
	android:gravity="center"
	android:padding="10dp">

	<TextClock
		android:layout_width="wrap_content"
		android:layout_height="wrap_content"
		android:id="@+id/mainTextClock1"
		android:textSize="50sp"
		android:textColor="#FB1F11"/>

</LinearLayout>
Step 3: Open app -> java -> package and open MainActivity.java. Add following code in it.
package com.myexample.clock;

import android.app.*;
import android.os.*;
import android.widget.*;

public class MainActivity extends Activity
{

    @Override
    protected void onCreate(Bundle savedInstanceState)
    {
        super.onCreate(savedInstanceState);
        setContentView(R.layout.main);

		TextClock clock = findViewById(R.id.mainTextClock1);
		//Specify the formatting pattern used to display the date and/or time in 24-hour mode
        clock.setFormat24Hour("dd MMM yyyy hh:mm:ss cccc");
    }
}
Output:
Now run the app. The app will display the current date, current time, and day.
This code is only valid for android API level 17 and above.
TextClock can also be created programmatically and added to a LinearLayout, using code given below.
// Create a TextClock programmatically
TextClock clock = new TextClock(this);
// Set text size for the clock
clock.setTextSize(50);
// Set text color for the clock
clock.setTextColor(Color.RED);
// Set format for displaying date and time
clock.setFormat24Hour("dd MMM yyyy hh:mm:ss cccc");
// Add the TextClock to a LinearLayout linear2
linear2.addView(clock);