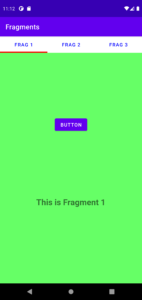
This post describes how to create a ViewPager which displays Fragments according to the Tabs selected in TabLayout.
- In activity_main.xml add a TabLayout and a ViewPager.
<?xml version="1.0" encoding="utf-8"?>
<androidx.constraintlayout.widget.ConstraintLayout xmlns:android="http://schemas.android.com/apk/res/android"
    xmlns:app="http://schemas.android.com/apk/res-auto"
    xmlns:tools="http://schemas.android.com/tools"
    android:layout_width="match_parent"
    android:layout_height="match_parent"
    tools:context=".MainActivity">

    <com.google.android.material.tabs.TabLayout
        android:id="@+id/_tab"
        android:layout_width="match_parent"
        android:layout_height="wrap_content"
        app:layout_constraintEnd_toEndOf="parent"
        app:layout_constraintStart_toStartOf="parent"
        app:layout_constraintTop_toTopOf="parent"
        app:tabIndicatorColor="#ff0000"
        app:tabIndicatorHeight="4dp"
        app:tabMode="fixed"
        app:tabTextColor="#0000ff" />

    <androidx.viewpager2.widget.ViewPager2
        android:id="@+id/viewpager"
        android:layout_width="match_parent"
        android:layout_height="0dp"
        app:layout_constraintBottom_toBottomOf="parent"
        app:layout_constraintEnd_toEndOf="parent"
        app:layout_constraintStart_toStartOf="parent"
        app:layout_constraintTop_toBottomOf="@+id/_tab" />

</androidx.constraintlayout.widget.ConstraintLayout>
2. Create fragment1.xml.
<?xml version="1.0" encoding="utf-8"?>
<androidx.constraintlayout.widget.ConstraintLayout xmlns:android="http://schemas.android.com/apk/res/android"
    xmlns:app="http://schemas.android.com/apk/res-auto"
    xmlns:tools="http://schemas.android.com/tools"
    android:layout_width="match_parent"
    android:layout_height="match_parent"
    android:background="#66ff66">

    <Button
        android:id="@+id/button1"
        android:layout_width="wrap_content"
        android:layout_height="wrap_content"
        android:text="Button"
        app:layout_constraintBottom_toTopOf="@+id/textView1"
        app:layout_constraintEnd_toEndOf="parent"
        app:layout_constraintStart_toStartOf="parent"
        app:layout_constraintTop_toTopOf="parent" />

    <TextView
        android:id="@+id/textView1"
        android:layout_width="wrap_content"
        android:layout_height="wrap_content"
        android:layout_marginBottom="220dp"
        android:text="TextView"
        android:textStyle="bold"
        android:textSize="24dp"
        app:layout_constraintBottom_toBottomOf="parent"
        app:layout_constraintEnd_toEndOf="parent"
        app:layout_constraintHorizontal_bias="0.498"
        app:layout_constraintStart_toStartOf="parent" />
</androidx.constraintlayout.widget.ConstraintLayout>
3. Create FirstFragment.java.
package com.example.fragments;

import android.os.Bundle;
import android.view.LayoutInflater;
import android.view.View;
import android.view.ViewGroup;
import android.widget.Button;
import android.widget.TextView;

import androidx.annotation.NonNull;
import androidx.annotation.Nullable;
import androidx.fragment.app.Fragment;

public class FirstFragment extends Fragment {

    @Nullable
    @Override
    public View onCreateView(@NonNull LayoutInflater inflater, @Nullable ViewGroup container, @Nullable Bundle savedInstanceState) {
        View fragview = inflater.inflate(R.layout.fragment1, container, false);
        return fragview;
    }

    @Override
    public void onViewCreated(@NonNull View view, @Nullable Bundle savedInstanceState) {
        super.onViewCreated(view, savedInstanceState);

        Button button1 = view.findViewById(R.id.button1);
        TextView textview1 = view.findViewById(R.id.textView1);

        button1.setOnClickListener(new View.OnClickListener() {
            @Override
            public void onClick(View v) {
                textview1.setText("This is Fragment 1");
            }
        });

    }
}
4. Create fragment2.xml.
<?xml version="1.0" encoding="utf-8"?>
<androidx.constraintlayout.widget.ConstraintLayout xmlns:android="http://schemas.android.com/apk/res/android"
    xmlns:app="http://schemas.android.com/apk/res-auto"
    xmlns:tools="http://schemas.android.com/tools"
    android:layout_width="match_parent"
    android:layout_height="match_parent"
    android:background="#ff6666">

    <Button
        android:id="@+id/button2"
        android:layout_width="wrap_content"
        android:layout_height="wrap_content"
        android:text="Button"
        app:layout_constraintBottom_toTopOf="@+id/textView2"
        app:layout_constraintEnd_toEndOf="parent"
        app:layout_constraintStart_toStartOf="parent"
        app:layout_constraintTop_toTopOf="parent" />

    <TextView
        android:id="@+id/textView2"
        android:layout_width="wrap_content"
        android:layout_height="wrap_content"
        android:layout_marginBottom="220dp"
        android:text="TextView"
        android:textSize="24dp"
        app:layout_constraintBottom_toBottomOf="parent"
        app:layout_constraintEnd_toEndOf="parent"
        app:layout_constraintHorizontal_bias="0.498"
        app:layout_constraintStart_toStartOf="parent" />
</androidx.constraintlayout.widget.ConstraintLayout>
5. Create SecondFragment.java.
package com.example.fragments;

import android.os.Bundle;
import android.view.LayoutInflater;
import android.view.View;
import android.view.ViewGroup;
import android.widget.Button;
import android.widget.TextView;

import androidx.annotation.NonNull;
import androidx.annotation.Nullable;
import androidx.fragment.app.Fragment;

public class SecondFragment extends Fragment {

    @Nullable
    @Override
    public View onCreateView(@NonNull LayoutInflater inflater, @Nullable ViewGroup container, @Nullable Bundle savedInstanceState) {
        View fragview = inflater.inflate(R.layout.fragment2, container, false);
        return fragview;
    }

    @Override
    public void onViewCreated(@NonNull View view, @Nullable Bundle savedInstanceState) {
        super.onViewCreated(view, savedInstanceState);

        Button button2 = view.findViewById(R.id.button2);
        TextView textview2 = view.findViewById(R.id.textView2);

        button2.setOnClickListener(new View.OnClickListener() {
            @Override
            public void onClick(View v) {
                textview2.setText("This is Fragment 2");
            }
        });

    }
}
6. Create fragment3.xml.
<?xml version="1.0" encoding="utf-8"?>
<androidx.constraintlayout.widget.ConstraintLayout xmlns:android="http://schemas.android.com/apk/res/android"
    xmlns:app="http://schemas.android.com/apk/res-auto"
    xmlns:tools="http://schemas.android.com/tools"
    android:layout_width="match_parent"
    android:layout_height="match_parent"
    android:background="#88aaff">

    <Button
        android:id="@+id/button3"
        android:layout_width="wrap_content"
        android:layout_height="wrap_content"
        android:text="Button"
        app:layout_constraintBottom_toTopOf="@+id/textView3"
        app:layout_constraintEnd_toEndOf="parent"
        app:layout_constraintStart_toStartOf="parent"
        app:layout_constraintTop_toTopOf="parent" />

    <TextView
        android:id="@+id/textView3"
        android:layout_width="wrap_content"
        android:layout_height="wrap_content"
        android:text="TextView"
        android:textSize="24dp"
        android:textStyle="bold"
        app:layout_constraintBottom_toBottomOf="parent"
        app:layout_constraintEnd_toEndOf="parent"
        app:layout_constraintStart_toStartOf="parent"
        app:layout_constraintTop_toTopOf="parent" />
</androidx.constraintlayout.widget.ConstraintLayout>
7. Create ThirdFragment.java.
package com.example.fragments;

import android.os.Bundle;
import android.view.LayoutInflater;
import android.view.View;
import android.view.ViewGroup;
import android.widget.Button;
import android.widget.TextView;

import androidx.annotation.NonNull;
import androidx.annotation.Nullable;
import androidx.fragment.app.Fragment;

public class ThirdFragment extends Fragment {

    @Nullable
    @Override
    public View onCreateView(@NonNull LayoutInflater inflater, @Nullable ViewGroup container, Bundle savedInstanceState) {
        View frag = inflater.inflate(R.layout.fragment3, container, false);
        return frag;
    }

    @Override
    public void onViewCreated(@NonNull View view, @Nullable Bundle savedInstanceState) {
        super.onViewCreated(view, savedInstanceState);

        Button button3 = view.findViewById(R.id.button3);
        TextView textview3 = view.findViewById(R.id.textView3);

        button3.setOnClickListener(new View.OnClickListener() {
            @Override
            public void onClick(View v) {
                textview3.setText("This is Fragment 3.");
            }
        });

    }
}
8. In MainActivity.java, set up the ViewPager with TabLayout and display the fragments in ViewPager.
package com.example.fragments;

import androidx.annotation.NonNull;
import androidx.appcompat.app.AppCompatActivity;
import androidx.fragment.app.Fragment;
import androidx.fragment.app.FragmentTransaction;
import androidx.viewpager2.adapter.FragmentStateAdapter;
import androidx.viewpager2.widget.ViewPager2;

import android.os.Bundle;
import android.view.View;
import android.widget.Button;

import com.google.android.material.tabs.TabLayout;
import com.google.android.material.tabs.TabLayoutMediator;

public class MainActivity extends AppCompatActivity {

    @Override
    protected void onCreate(Bundle savedInstanceState) {
        super.onCreate(savedInstanceState);
        setContentView(R.layout.activity_main);

        TabLayout tabLayout = findViewById(R.id._tab);
        ViewPager2 viewPager = findViewById(R.id.viewpager);

        tabLayout.addTab(tabLayout.newTab().setText("Frag 1"), 0);
        tabLayout.addTab(tabLayout.newTab().setText("Frag 2"), 1);
        tabLayout.addTab(tabLayout.newTab().setText("Frag 3"), 2);

        FragmentStateAdapter pagerAdapter = new ScreenSlidePagerAdapter(MainActivity.this);
        viewPager.setAdapter(pagerAdapter);

        new TabLayoutMediator(tabLayout, viewPager, new TabLayoutMediator.TabConfigurationStrategy() {
            @Override
            public void onConfigureTab(@NonNull TabLayout.Tab tab, int position) {
                if (position==0) tab.setText("Frag 1");
                if (position==1) tab.setText("Frag 2");
                if (position==2) tab.setText("Frag 3");
            }
        }).attach();

        tabLayout.addOnTabSelectedListener(new TabLayout.OnTabSelectedListener() {
            @Override
            public void onTabSelected(TabLayout.Tab tab) {
                viewPager.setCurrentItem(tab.getPosition());
            }
            @Override
            public void onTabUnselected(TabLayout.Tab tab) {
            }
            @Override
            public void onTabReselected(TabLayout.Tab tab) {
            }
        });

        viewPager.setCurrentItem(0);

    }


    class ScreenSlidePagerAdapter extends FragmentStateAdapter {
        public ScreenSlidePagerAdapter(AppCompatActivity fa) {
            super(fa);
        }

        @Override
        public Fragment createFragment(int position) {
            Fragment frag_new = null;
            if (position==0) frag_new= new FirstFragment();
            if (position==1) frag_new= new SecondFragment();
            if (position==2) frag_new= new ThirdFragment();

            return frag_new;
        }

        @Override
        public int getItemCount() {
            return 3;
        }
    }

}
Now run the project and see the results. The app will show a ViewPager with TabLayout as shown in image below.
